7/5/11

Framed Star


I needed something for my door for the 4th of July.  So I made this framed star.  It was pretty easy!

First, I bought some 2.5" wide mdf and cut it into equal lengths with 45 degree angles.  The star used to be a dark red, but I spray painted it silver.

Then, I glued and nailed the corners of the frame.  I was trying to get around having to use the nail gun so I stapled the back side of the joints and used wood glue, but in the end had to use the nail gun to keep the joints together.


After nailing it together, I puttied the joints and sanded them once it was dry.


 I primed it with KILZ and used this to spray paint it:


I threaded the ribbon through a loop on the back of the star and stapled it to the back of the frame.  I normally don't think to use ivory & silver & gold together, but they all seemed to go well. 


I hung it on my door and at first thought it was way too big for the space.  BUT then it grew on me and I really love it there now!


Aren't we patriotic!


Future Hutch Project

Look what I found!!!

I am so excited to re-do this hutch!

It needs some work!  It's an odd shade of green, not at all symmetrical, needs some TLC, and a few creative touches!


Stay tuned...

6/21/11

Night Stand Do Over

A long time ago I inherited this little side table.  I've been using it as a nightstand ever since.  Let's just say "hunter green" is not my fave.  So instead of purchasing a new nightstand, I decided to just give the old one a new look!

Here it is BEFORE:
 And AFTER!
Yah, it's YELLOW!  And right now I really love yellow.  I was going for a "butter yellow" but it turned out a little more "lemon yellow".  I almost changed it, but decided I liked it.

When I was getting ready to paint it, I could have taken it apart completely, but I just took the door off and the table top off and sanded it a wee bit.  Then I primed it and spray painted it with "Bright Idea" by Krylon. 
  

I glazed it with a black glaze to make it a little less shiny and a little more antiquey-looking.  Just like I did with the child's rocking chair.  And then I replaced the old wooden knob with a glass one.


And here it is sitting in my room in it's rightful spot, looking all summery and cheerful!


 LOVE it!

Plaster Magnets

I love having little crafts for the kids to do during the summer.  This one was fun and easy.  I bought little packages of plaster magnets from Michaels.  They come with the paint and a little brush.  Here are a few of their master-pieces:


Paper Mache Volcano

School projects, reports, plays, (and anything else a teacher can dream up) always pile up the last few weeks of the school year.  This year my son had a volcano project due on the last day.  We could make it any way we wanted and use whatever kind of explosion that we wanted...as long as it was legal of course :-)  I have to admit, I'm usually not too excited about the last minute projects, but this one was fun!  And best of all, we kept it simple!

We formed the volcano out of cardboard, making sure it would be the right height for a glass bottle.


And taped it together on the inside like this:


Then we made the paper mache goop out of water and flour; just mix flour and water until you get it to a good consistency...like pancake batter.  We used brown paper bags, because for some reason we didn't have any newspaper.  Overlap the paper, but don't do more than three layers.


You can bet no one had a volcano shaped like this one :-)  

We cut a hole in the center of the cardboard base that the volcano sits on so he could slide a bottle underneath the volcano when it came time.


After it dried I spray painted it brown.  We didn't think regular paint would cover the brown very well, so we decided to make the same paper mache goop (flour + water) and color it with food coloring and pour it down the sides to look like lava.  We did three different colors.


Then we experimented with different eruptions:

First, the typical water + dish soap + vinegar + baking soda mixture, which was typical and not that exciting.

Then one I had never heard of, the ketchup + dish soap + baking soda mixture.  This one oozed very slowly and maybe looked the most realistic.  But it wasn't quite "explosive" enough for my son.

So we ended up doing the Diet Dr. Pepper + Mint Mentos, which is super explosive and fun,...although the eruption doesn't last for more than a few seconds.

He ended up getting 100% on his project :-) 

New find!

Look what I found at DI!!!

 I am so excited to makeover this antique desk!
Stay tuned...

5/27/11

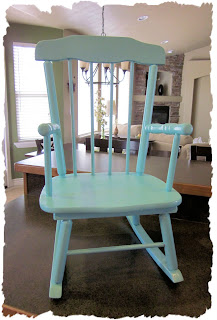
Antique Child's Rocker Makeover


When I was only one year old my parents bought me this adorable antique rocking chair for Christmas.  If it was an antique like 30 years ago, (Oops! Did I say 30?  I really meant to say 25 or so) then it's even more antiquey now!

When I left home it came with me.  And with several moves and five kids later...needless to say, it didn't get taken good care of.  I am a sentimental FOOL so this broke my heart, and I decided to give it a makeover!

I had to take it apart because it was a bit wobbly and needed re-glueing.  I disassembled and started sanding.  I forgot to take a picture before taking it apart, so here it is a little way into the project:

After sanding, I re-glued the top portion:

I ran into a little problem at this point.  The place where the wooden legs attached to the rockers were weak and broke apart.  So I needed to drill out the holes.  I realized that a previous owner had put nails into the rocker to keep it together.  That made it a little more difficult.

Before drilling:

After drilling the 1/2" new holes:

After drilling, I sanded it, cut a dowel to fit, reassembled, and glued it back together again...(You know, like Humpty Dumpty!) 

Now here's the fun part!  I spray painted the rocker with Blue Ocean Breeze...LOVE that color!  I always thought that spray painting was not the best thing to do when you want something to look nice.  You must paint using the ole can of paint and a brush.  I was wrong!  The trick to spray painting is doing a primer first, then doing several LIGHT coats of paint.  If you spray it on too thickly you'll get drips and uneven coverage.


After spray painting the rocker it looked too bright & shiny & new...for an antique!  So next I GLAZED it.  This is way super easy.  I bought faux glaze at Home Depot and asked them to tint it black.  I applied the glaze to just one section at a time, because you don't want it to set for too long.  With a dry rag, I wiped the glaze off, leaving the glaze in the cracks and grain of the wood.  Then I went over it with a wet rag to get even more of the glaze off, and then went on to the next section.  You can always go over places if you want it darker, but once it's dry you can't get it up...so start light.  Here is a great tutorial from Vintage Revivals!


(Yes, I was doing this is my kitchen!  My basement is just too dark :-)

I love how the glaze looks!  See how it's darker in the cracks & grooves?  And now it doesn't look so new & shiny...it has character!


For now, the little rocker sits in Sara (4) and Violet's (1) room.  


I love how perfectly the rocker matches the curtains I made a few years ago!
See?


(Both Violet and Bear like to sit in the rocker :-)


The little rocker has a lot of imperfections, but I absolutely love it because of them...just adds character.  Now it has new life and I LOVE how it turned out!

TA-DA!


DISCLAIMER (for my great grandchildren): I have to apologize in advance.  Someday when you take this rocking chair to the ANTIQUE ROADSHOW, the antique-specialist guy will say, "This could have been worth thousands of dollars, BUT someone refinished it, greatly reducing it's worth."  

Uh, my bad.
Sorry.

But I give you permission to love it like I love it and change it and refinish it any way you like...

LONG LIVE the LITTLE ROCKER!  

5/17/11

Birthday Party Must-Haves!

I absolutely LOVE celebrating my kids' birthdays!  It's a day where I do my very best to make them feel special.  I decided a long time ago that you don't have to spoil them with tons of presents to make them feel that way.  But you do have to spoil them with time and thoughtfulness!  Isn't that what we all crave any way???  Oh and hugs, cuddles and spankings... (Yep, this year it was 7 spankings to be exact :-)  Soooo this is what my house looks like on a birthday.  Nothing you see here is expensive.  But it sure looks like a PARTY!


Tissue Paper Puff Balls are way super easy!  And CHEAP!  All you need is tissue paper (like the kind you wrap presents with) and I just buy the 99 cent packs, and clear plastic string or ribbon.   I hang them from the ceiling with thumb tacks.


The string of lanterns plug in and create a fun ambiance, especially if you're partying after the sun goes down.  And the boa is just so much easier and cuter than crepe paper!  Both can be found at Hobby Lobby.  Our birthday boy/girl sits there in front of the fireplace to open gifts, so it has to be a festive-looking spot for pictures!

The banner and table cloth?  Walmart!  The banner we've had for years and just keep reusing it.  No one seems to mind :-)

Balloons?  Smiths or any grocery store.  I love balloons!  They're cheap and a great finishing touch to any party decor! 

The next thing you need is a birthday cake!
   
Did you recognize the cake stand?  Yay, I finally got to use it!  

Frosting and I have a very tumultuous relationship.  Nothing seems to go right with us!  Frosting is one art medium (yes, it is art...in the right hands :-) that I haven't quite figured out despite years and years of trying.  So I am now trying FONDANT!  I used to love my pottery class in high school.  And using fondant is kinda sorta like sculpting (except for the fact that you try your best not to handle it too much).  I learned how to use fondant from You Tube:

Here are some useful links
here, here, and here.

A good fondant cake is supposed to be "flawless", but let's be honest...my cake was far from flawless!!!  But it was still a lot of fun to do, and despite the flaws and bad frosting job... I like the way it turned out.

You can buy fondant just about anywhere; Walmart has pre-dyed colors, and craft stores have the pre-dyed and the plain white.  If you're going to dye the fondant yourself be sure to wear gloves!  (My hands may or may not have been dyed hot pink :-)

I got my design idea from this (picture on left) and I tried it 4 years ago for Kaeli (picture on right):


I'm still not sure why my cake turned out so round this time, instead of the nice sharp edge on top, hmmm? 

The most important "must-have" for a successful birthday party is...
 well, a birthday girl of course!

5/8/11

Cake Stand

I love my new cake stand!  I found a cute plate, which is actually melamine, and a candle stick holder,...


and glued them together.  Kinda girly, huh?


We have a birthday coming up next week and I can't wait to use it!

LinkWithin

Related Posts Plugin for WordPress, Blogger...