5/27/11

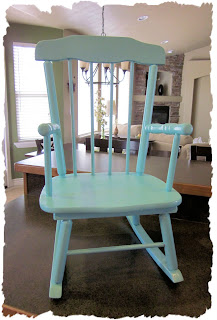
Antique Child's Rocker Makeover


When I was only one year old my parents bought me this adorable antique rocking chair for Christmas.  If it was an antique like 30 years ago, (Oops! Did I say 30?  I really meant to say 25 or so) then it's even more antiquey now!

When I left home it came with me.  And with several moves and five kids later...needless to say, it didn't get taken good care of.  I am a sentimental FOOL so this broke my heart, and I decided to give it a makeover!

I had to take it apart because it was a bit wobbly and needed re-glueing.  I disassembled and started sanding.  I forgot to take a picture before taking it apart, so here it is a little way into the project:

After sanding, I re-glued the top portion:

I ran into a little problem at this point.  The place where the wooden legs attached to the rockers were weak and broke apart.  So I needed to drill out the holes.  I realized that a previous owner had put nails into the rocker to keep it together.  That made it a little more difficult.

Before drilling:

After drilling the 1/2" new holes:

After drilling, I sanded it, cut a dowel to fit, reassembled, and glued it back together again...(You know, like Humpty Dumpty!) 

Now here's the fun part!  I spray painted the rocker with Blue Ocean Breeze...LOVE that color!  I always thought that spray painting was not the best thing to do when you want something to look nice.  You must paint using the ole can of paint and a brush.  I was wrong!  The trick to spray painting is doing a primer first, then doing several LIGHT coats of paint.  If you spray it on too thickly you'll get drips and uneven coverage.


After spray painting the rocker it looked too bright & shiny & new...for an antique!  So next I GLAZED it.  This is way super easy.  I bought faux glaze at Home Depot and asked them to tint it black.  I applied the glaze to just one section at a time, because you don't want it to set for too long.  With a dry rag, I wiped the glaze off, leaving the glaze in the cracks and grain of the wood.  Then I went over it with a wet rag to get even more of the glaze off, and then went on to the next section.  You can always go over places if you want it darker, but once it's dry you can't get it up...so start light.  Here is a great tutorial from Vintage Revivals!


(Yes, I was doing this is my kitchen!  My basement is just too dark :-)

I love how the glaze looks!  See how it's darker in the cracks & grooves?  And now it doesn't look so new & shiny...it has character!


For now, the little rocker sits in Sara (4) and Violet's (1) room.  


I love how perfectly the rocker matches the curtains I made a few years ago!
See?


(Both Violet and Bear like to sit in the rocker :-)


The little rocker has a lot of imperfections, but I absolutely love it because of them...just adds character.  Now it has new life and I LOVE how it turned out!

TA-DA!


DISCLAIMER (for my great grandchildren): I have to apologize in advance.  Someday when you take this rocking chair to the ANTIQUE ROADSHOW, the antique-specialist guy will say, "This could have been worth thousands of dollars, BUT someone refinished it, greatly reducing it's worth."  

Uh, my bad.
Sorry.

But I give you permission to love it like I love it and change it and refinish it any way you like...

LONG LIVE the LITTLE ROCKER!  

5/17/11

Birthday Party Must-Haves!

I absolutely LOVE celebrating my kids' birthdays!  It's a day where I do my very best to make them feel special.  I decided a long time ago that you don't have to spoil them with tons of presents to make them feel that way.  But you do have to spoil them with time and thoughtfulness!  Isn't that what we all crave any way???  Oh and hugs, cuddles and spankings... (Yep, this year it was 7 spankings to be exact :-)  Soooo this is what my house looks like on a birthday.  Nothing you see here is expensive.  But it sure looks like a PARTY!


Tissue Paper Puff Balls are way super easy!  And CHEAP!  All you need is tissue paper (like the kind you wrap presents with) and I just buy the 99 cent packs, and clear plastic string or ribbon.   I hang them from the ceiling with thumb tacks.


The string of lanterns plug in and create a fun ambiance, especially if you're partying after the sun goes down.  And the boa is just so much easier and cuter than crepe paper!  Both can be found at Hobby Lobby.  Our birthday boy/girl sits there in front of the fireplace to open gifts, so it has to be a festive-looking spot for pictures!

The banner and table cloth?  Walmart!  The banner we've had for years and just keep reusing it.  No one seems to mind :-)

Balloons?  Smiths or any grocery store.  I love balloons!  They're cheap and a great finishing touch to any party decor! 

The next thing you need is a birthday cake!
   
Did you recognize the cake stand?  Yay, I finally got to use it!  

Frosting and I have a very tumultuous relationship.  Nothing seems to go right with us!  Frosting is one art medium (yes, it is art...in the right hands :-) that I haven't quite figured out despite years and years of trying.  So I am now trying FONDANT!  I used to love my pottery class in high school.  And using fondant is kinda sorta like sculpting (except for the fact that you try your best not to handle it too much).  I learned how to use fondant from You Tube:

Here are some useful links
here, here, and here.

A good fondant cake is supposed to be "flawless", but let's be honest...my cake was far from flawless!!!  But it was still a lot of fun to do, and despite the flaws and bad frosting job... I like the way it turned out.

You can buy fondant just about anywhere; Walmart has pre-dyed colors, and craft stores have the pre-dyed and the plain white.  If you're going to dye the fondant yourself be sure to wear gloves!  (My hands may or may not have been dyed hot pink :-)

I got my design idea from this (picture on left) and I tried it 4 years ago for Kaeli (picture on right):


I'm still not sure why my cake turned out so round this time, instead of the nice sharp edge on top, hmmm? 

The most important "must-have" for a successful birthday party is...
 well, a birthday girl of course!

5/8/11

Cake Stand

I love my new cake stand!  I found a cute plate, which is actually melamine, and a candle stick holder,...


and glued them together.  Kinda girly, huh?


We have a birthday coming up next week and I can't wait to use it!

Tie-Dye Apron


Have you ever had a teacher that seemed to be PERFECT for your child...and fit their needs in a PERFECT way?  I think it's pretty rare, but boy did we hit the jackpot this year!!!  I must say, my kids have the BESTEST teachers EVA!  Each of them are fabulous in their own way!  So in honor of Teacher Appreciation Week, I was looking for a gift that we could give these awesome teachers...that was different from the regular ole candle or craft that will most likely find it's way in the trash.  So I made these tie-dye aprons...hopefully, it'll be something the teachers can use during ART TIME (always my favorite subject)!


I bought plain white aprons at Hobby Lobby (I wanted the ones with pockets)...
...and tie-dyed them!


Totally GROOVY, right?


Then I folded them up, so the pocket was in the front, taped the paint brushes to the inside of the pocket (I'm sure you can guess why I had to use tape), and stuck in a heart-felt note (awww).  And voila, I had a totally groovy and original gift for the teachers!

5/4/11

Board & Batten

Look what I've been up to?
This weekend I put board and batten in our front room!


We bought primed mdf from Home Depot:
Header: (2) 5-1/2' x 6'
Verticals: (11) 1-1/2 x 8'

After a tutorial from da hubbs on how to use a chop saw and a nail gun, I went to work.  It took a full day, but it was totally do-able and FUN!  Here's how to do it:

1. MEASURE
Measure out the wall for the vertical boards, using painter's tape to mark it. Making sure that the boards won't cover any outlets or light switches. There are 10.5 inches between each vertical board. But I really only measured every 12" keeping in mind that the mark would line up to the left of each board. 12"-1.5"(width of board)=10.5". Then I marked where the header would go, usin
g a level and pencil.

2. HEADER
Measure the header (I used two boards) and cut the edges at 45 degree angles where they join. Using liquid nails I glued the header in place, checking with the level to make sure it was all good. I used the T-support to hold it in place so I could nail it. (Holy cow mdf is heavy!) I used 1.25" finishing nails. Then with a pencil I marked on the bottom on the header the 12" increments for the vertical boards.


3. MEASURE AND CUT VERTICALS
Line up each board to the marks on the header. Number each board on the back along with the length it needs to be cut to. Measure each board individually because the may need to be cut at different lengths. (I didn't want the vertical boards to hang over the existing base board, so I cut 45 degree angles leaving 0.25" blunt edge, so it didn't come to a point, at the bottom of each board. That sounds confusing so refer to the picture below).

When the bottom cuts are done, measure and mark each board according to their individual measurements and cut them to length.

4. GLUE & NAIL VERTICALS
Line up each vertical board to their place and make sure they'll fit. One at a time, glue the board with liquid nails, lining it up to the mark on the header and checking with a level. When it's good and level, nail it in place.


5. CAULK & PAINT
Fill in nail holes and joints with putty. Caulk around all the boards with paint-able caulk. Sand the putty places. Tape off the walls and paint. And then paint again...


TA-DA!

 
My decorations are still a work in progress.  As soon as my basement is finished the piano is moving downstairs and I hope to replace it with a cute chair and lamp.  Oh, and a hutch will replace my armoire...some day.  I search ksl classifieds weekly for "the one", to refinish just the way I want.

Freezer Paper T-Shirts


1. Find the design you want and put it on paper.
I googled to find the perfect images and then tweaked them a wee bit in photoshop, and printed them. For more complex designs you'll have to print a few copies for each layer of paint.

2. Cut out the design on freezer paper.
Lay down cardboard to protect your counter and then the freezer paper (glossy side down) on top of that, and then the paper with the design on top of that. Tape it all in place and cut out with an exact-o knife. Words and more intricate designs can make it tricky so try to keep your designs simple. The part you cut out is the part that will be painted. You're making a stencil.

3. Iron on the freezer paper to your shirt.
Iron your shirt first so there are no wrinkles. Make sure your iron isn't on the steam setting. You want a dry iron. Place the freezer paper, glossy side down, and iron it to the t-shirt.

4. Paint!
This is the fun part. Paint with fabric paints using a foam brush. Make sure you paint by blotting up and down, instead of moving your brush across sideways. This prevents bleeding under the stencil.

5. Let it dry.
If you're in a hurry or as impatient as I am, you can use a blow-dryer to speed up the process. Once it's dry remove the freezer paper. If you have more layers repeat steps 2-5 until you're all done!


Here are the kids in their St. Patty's get-up before school:

  And we mustn't forget the wee lasses!

Springy Pillows


I have been on a search for green and springy-looking pillows, and kept coming up empty handed. So I was forced to break out the sewing machine and make some. I made four. I still think I need more color though.

Hmmmm...any ideas?

One-Eyed Monster Bundt Cake


I wanted to make a birthday cake for Sam using my new bundt pan. I stared at it trying to figure out what on earth I could make out of it that he would like. I came up with the one-eyed monster!


You can use any size bundt pan. The one I used is smaller than the norm.


Bake the cake following directions on the box or bake it from scratch...whatever floats your boat. Let it cool.

For the eyeball, scavenge for the perfect-sized ball. I found that golf balls were too small, and wiffle balls and tennis balls were too big. I was lucky to find a large bouncy ball that was a perfect fit.

Wrap the ball in press n' seal (love that stuff), and gather it all at one end, twisty-tie it, and cut off the excess with scissors. The twisty-tie side goes down.

Use a small cup to balance and steady the ball so you can paint it without it rolling around. I used a medicine cup. If you don't want paint to get on the cup, wrap it in press n' seal too.

Paint an eyeball on the press n' seal-covered ball with acrylic paints. (I bet permanent markers would work too!)

While the eyeball dries, decorate the cake with green frosting, using the star tip. You don't need to cover the entire cake, just enough to make it look hairy. Frost on an eyebrow and smile.

Make arms out of chenille stems.

Make teeth by cutting a large marshmallow with scissors.

Find some horns! I used Violet's banana cookies (you can find them in the baby aisle).

Plop the eyeball down in the center of the bundt, stick the arms into the side of the cake, stick the horns in, and place marshmallow teeth sticky-side down, and...

VOILA!
You have an One-eyed Monster Birthday Cake!

I was happy how it turned out considering it was a PIECE OF CAKE to create!

LinkWithin

Related Posts Plugin for WordPress, Blogger...